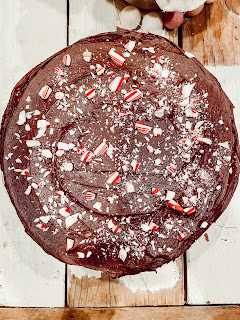
Gluten Free Chocolate Cake with Peppermint Filling
Gluten Free • Egg Free • Nut Free • (Dairy free option)
Gluten Free Chocolate Cake with Peppermint Filling
Bake Time: 35min
Oven Temp: 350℉
Recipe:
Chocolate Cake:
½ cup Butter, softened
½ cup Coconut Oil, melted
1 ¾ cups Granulated Sugar
4 Applesauce cups (1 cup)
1 tbsp Vanilla Extract
1 ½ tsp Baking Soda
1 ½ tsp Baking Powder
1 tsp Salt
¾ cups Buttermilk (or ¾ cups milk and 1tbsp lemon juice)
½ cup hot coffee (or ¼ cup espresso + ¼ cup hot Water)
¾ cups Organic Unsweetened Cocoa Powder
3 cups Gluten Free Flour
- 16oz Chocolate Frosting
- 2 Candy Canes, crushed
Simple Syrup (optional):
¼ cup Hot Water
¼ cup Granulated Sugar
Peppermint Filling:
16oz Vanilla Frosting
Natural Red food coloring
5 drops Young Living Peppermint vitality essential oil
Equipment:
2 round cake pans
Stand mixer (optional)
Measuring cups and spoons
Pastry brush (or unused clean paintbrush)
3 quart plastic bags
Dairy Free option:
Directions:
Cake
- Preheat oven to 350℉.
- Mix together the butter, coconut oil, and sugar in a bowl. Then add in the vanilla extract, salt, baking powder and soda, and applesauce cups. Mix until smooth. Then add in the coffee mix and buttermilk (if making the buttermilk substitute: in a cup, pour the milk and lemon juice and let sit for about 5 minutes).
- Add in the cocoa powder and GF flour one cup at a time. Mix ingredients together until everything is all combined and smooth.
- Spray 2 round cake pans with spray oil. Then pour the batter evenly between the two pans.
- Bake for 35 minutes or until a knife inserted can come out clean. Let cakes cool cool for about 10 minutes or until cool enough to frost.
- Pour into a glass cup the hot water and sugar. Stir for the sugar to melt and let cool. Set aside.
- Using pre-made frosting (vanilla, buttercream, or cream cheese), add 5 drops of Young Living peppermint vitality essential oil into the frosting and stir.
- Divide the frosting into two bowls. In one of the bowls pour natural red food coloring until you have your desired color. I love to have it a nice bright shade of pink.
- Fill each plastic bag with the frosting. One pink peppermint, one white peppermint, and one chocolate. (I like to put the plastic bag into a cup, bottom corner down, and then put the frosting in). After you fill in each bag, cut the bottom tip corner where the frosting is, about a half an inch.
- Turn over one of the cooled cakes onto a large plate or serving stand. If using the simple syrup, spread it on now, using a pastry brush (or clean paint brush), onto only this first layer. Let soak into the cake for about 2 minutes.
- Pipe with the chocolate frosting a thick ring around the first layer of cake. Then pipe a thick ring of pink within the chocolate ring. Next a white ring within the pink ring and repeat with altering pink and white rings until you reach the center.
- Top this layer with the second cake layer. With the chocolate frosting, fill in the gaps between the two layers then frost the rest of the cake with the chocolate frosting and top with the crushed peppermint candies (if you don't know how to crush candy canes: place 2-3 candy canes into a plastic bag and on the floor crush with a hammer until your desired size (the smaller the better)).


I am very happy to say that this is an interesting article. I saw some new information from your article, you are doing a great job. Thanks for sharing this kind of blog. Cake Shop Near Me
ReplyDeleteThis comment has been removed by the author.
ReplyDelete